
Front End Overview
This page documents the front end files that are integrated into Django. See the standalone front end docs for the separate React front end.
Architecture
Section titled “Architecture”Pegasus’s front-end architecture is a hybrid model, with a front-end codebase that is compiled and used directly in Django templates via Django’s static files infrastructure.
Big picture, the front end is built with Vite, which compiles the front-end code into bundle files that can be referenced using Django’s static file system, as represented in the diagram below.
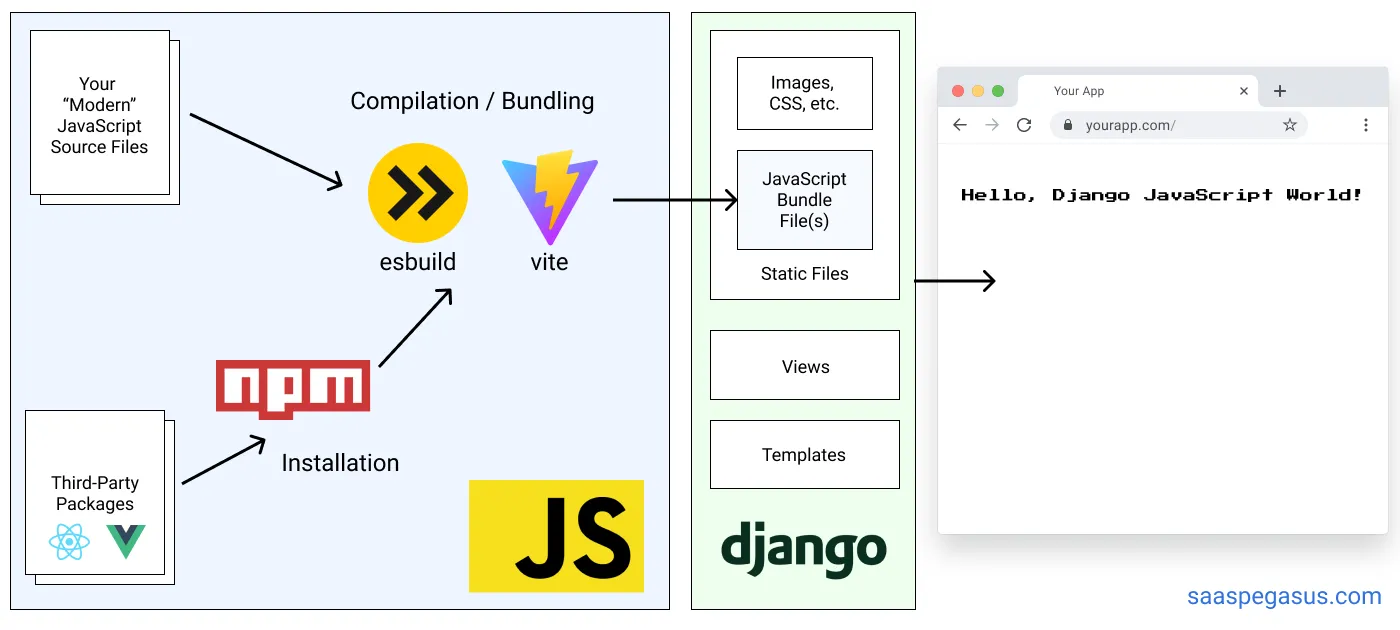
Note: Older versions of Pegasus supported a Webpack-based setup, which is now deprecated.
Pegasus’s styles use the Tailwind CSS framework, and building the CSS files is included as part of the front-end build pipeline. For more details on CSS in Pegasus, see the CSS documentation.
For a much more detailed overview of the rationale behind this architecture, and the details of the set up see the Modern JavaScript for Django Developers series.
Front-end files
Section titled “Front-end files”The source front-end files live in the assets directory, while the compiled files
get created in the static directory.
Generally you should only ever edit the front-end files in assets directly,
and use the tools described below to serve and build them.
Prerequisites to building the front end
Section titled “Prerequisites to building the front end”To compile the front-end JavaScript and CSS files it’s expected that you have installed:
Pegasus is developed and tested on the latest LTS releases, which (at the time of this writing) are Node version 24 and npm 11. Later versions will likely work, but aren’t regularly-tested.
It’s recommended to use nvm to manage different node/npm environments more easily.
nvm is essentially virtualenv for Node.js/npm.
Alternatively, you can build and run your front end with Docker. However, this has been known to cause performance problems in some environments.
Initial setup
Section titled “Initial setup”Once you’ve installed Node and NPM, you can install your front end dependencies by running:
npm installor in Docker:
make npm-installIn your project’s root directory. This will install all the dependencies necessary to build the front end.
It will also generate a package-lock.json file.
It is recommended that you add the package-lock.json to source control for consistency across installations.
Working with Vite and Django
Section titled “Working with Vite and Django”Pegasus integrates Vite with Django using django-vite, which runs in one of two modes:
- In development, front end assets are served directly from Vite’s dev server.
- In production, front end assets are built and served through Django’s static files system.
This is controlled by the dev_mode setting in your django-vite configuration,
which is tied to settings.DEBUG by default.
Running in development
Section titled “Running in development”Vite does not use bundle files in development.
Instead, your front end files are served by Vite’s development server (which is configured through django-vite).
This workflow gives you the benefit of added speed and fast page updates without reloading your browser, but it does mean that your Vite server must be running at all times during development.
To run your Vite server and serve your front end files you should run:
npm run devOr in Docker:
make npm-devThis command will also automatically refresh your front end whenever any changes are made.
Adding files to Django templates
Section titled “Adding files to Django templates”To add JavaScript files to Django templates you can use the vite_asset template tag from django-vite:
{% load django_vite %}{% vite_asset 'assets/javascript/my-page.js' %}For CSS files, use the vite_asset_url tag inside a regular stylesheet link:
{% load django_vite %}<link rel="stylesheet" href="{% vite_asset_url 'assets/styles/my-page.css' %}">If you are using React you also need to add the vite_react_refresh tag to get HMR working:
{% load django_vite %}{% vite_react_refresh %}{% vite_asset '<path to your React asset>' %}Building for production
Section titled “Building for production”To build for production, run:
npm run buildor in Docker:
make npm-buildThis will minify and optimize your files. In most supported deployment set ups, this will be run automatically for you as part of your deployment.
In production, settings.DEBUG should be disabled via an environment variable,
which will in turn disable django-vite’s dev mode.
Supported Pegasus deployments set this for you.
If you need more fine-grained control, or want to test a production build, you can also explicitly
set the DJANGO_VITE_DEV_MODE environment variable to false.
You will also need to set up Django’s static file serving. Again, if you’re using a supported Pegasus deployment mode, this should be already handled for you.
django-vite configuration
Section titled “django-vite configuration”The django-vite docs provide details about the vite configuration.
Here is the relevant declaration from settings.py:
DJANGO_VITE = { "default": { "dev_mode": env.bool("DJANGO_VITE_DEV_MODE", default=DEBUG), "dev_server_host": env("DJANGO_VITE_HOST", default="localhost"), "dev_server_port": env.int("DJANGO_VITE_PORT", default=5173), "manifest_path": BASE_DIR / "static" / ".vite" / "manifest.json", }}This should work without modification for most projects.
To change the Vite server’s port, set the DJANGO_VITE_PORT environment variable,
which is read by both vite.config.ts and django-vite.
If you change the base path, you will have to make corresponding changes to your django-vite settings
as per their documentation.
TypeScript and type checking
Section titled “TypeScript and type checking”Pegasus includes TypeScript as part of the front end code. You can write TypeScript or JavaScript code and it will be transpiled to work in a browser as part of the build pipeline.
The build pipeline does not explicitly do type checking. To do type checking you can run:
npm run type-checkOr in Docker:
make npm-type-checkType checks will also automatically run on new pull requests if you have enabled Github Actions on your project.