
Kamal (Deploy to any VPS)
Pegasus supports container-based deployment to any Linux server using Kamal.
Kamal is a deployment tool that uses Docker to deploy applications to servers. It is designed to be simple to use and to work with a single server or a cluster of servers. It can also be used to deploy multiple apps to the same server.
Kamal will deploy the app as Docker containers, and will also deploy the database and any other services that are required. It will also configure a load balancer (kamal-proxy) to route traffic to the app and configure SSL certificates using LetsEncrypt.
By default, Pegasus will run all the services on a single server, but Kamal is designed to work with multiple servers,
so you can easily move services to separate servers and update the Kamal configuration in config/deploy.yml.
Screencast
Section titled “Screencast”You can watch a screencast showing how to deploy to a Hetzner server with Kamal here:
Or follow along with the documentation below.
Overview
Section titled “Overview”Deploying on Kamal will require a few pieces:
- A server running Linux (the latest Ubuntu LTS is recommended---version 24.04 as of this writing) and accessible via SSH.
- A domain name for your app. You will need to create a DNS record pointing to your server’s IP address.
- A Docker registry to store your images. You can use Docker Hub or any other registry.
- A development environment where you install and configure Kamal.
We’ll walk through these in more detail in order below.
Provision and prepare your server
Section titled “Provision and prepare your server”The first step is to provision a server where you will host your application. Some popular choices include:
- Hetzner (get €20 credit and support Pegasus with this link).
- Digital Ocean Droplets (get $100 credit and support Pegasus with this link).
- Linode.
- AWS (Lightsail or EC2).
- Google Cloud.
- Microsoft Azure.
It is recommended to choose the latest Ubuntu LTS---version 24.04 as of this writing---for your operating system. Other operating systems might work, but are not tested or officially supported.
We also recommend at least 2GB of RAM.
Once you’ve chosen a hosting company and provisioned a server, follow the instructions provided to login (SSH) to the server. You will need to be able to log in remotely to complete the rest of the setup.
The rest of these instructions will run kamal as the root user. If you prefer to run kamal as a different user---which can prevent certain kinds of attacks---see the note below.
Set up DNS
Section titled “Set up DNS”To set up SSL you will need a DNS record pointing at your server. Create a new “A” record using whatever tool you use to manage your DNS, and point it at the IP address of the server you created above.
The most common domain to use is www.<yourdomain>.com.
Create the image repository
Section titled “Create the image repository”Before doing deployment, you need a place to store your Docker images, also known as a Docker registry. The two recommended options are Docker Hub and Amazon Elastic Container Registry (ECR).
Docker Hub is easier to use and good if you only have a single project (covered under their free tier). Amazon ECR is much more cost-effective if you have multiple projects---typically costing only pennies per project, per month.
You can choose another registry if you want, as described in the Kamal docs.
Using Docker Hub
Section titled “Using Docker Hub”First create an account on Docker Hub and note your username.
Then create a new repository, choosing a unique name for your app, and marking it “private”.
Finally you will need to create an access token. Go to “Account Settings” —> “Security” and make a new access token, giving it the default permissions of Read, Write, Delete. Save this token somewhere as you will need it in the next step and will only see it once.
Using Amazon ECR
Section titled “Using Amazon ECR”You will need an AWS account to use Amazon ECR.
- Login to the AWS console and navigate to the ECR service.
- Under “Private Registry” —> “Repositories” click “Create repository”.
- Choose a repository name, e.g. “myaccount/myapp” and keep the remaining defaults. Click “Create”.
- Next, in the IAM service, create an IAM user / group, giving it the
AmazonEC2ContainerRegistryFullAccesspermissions policy. - Create an access key for the user / group and save the credentials.
- Install and configure the AWS CLI on your local machine, using those credentials.
You can test that everything is working by running:
aws ecr get-login-passwordAnd confirming it returns a (very long!) password.
For a more detailed guide on setting up Amazon ECR with Kamal, see this detailed writeup.
Install and configure Kamal
Section titled “Install and configure Kamal”Finally, we can set everything up to deploy our production application with Kamal. If you have a Ruby environment available, you can install Kamal globally with:
gem install kamalNote: you may want to use rbenv to manage your environment.
If you don’t have Ruby running you can also use Docker to install Kamal, by creating an alias command as described in the Kamal docs here.
Create secrets file in the .kamal directory
Section titled “Create secrets file in the .kamal directory”Kamal expects a .kamal/secrets file in this folder which will contain all the environment variables needed for deployment.
The secrets file should not be checked into source control. See .kamal/secrets.example for the required variables.
cp .kamal/secrets.example .kamal/secretsUpdate the Kamal deploy.yml file
Section titled “Update the Kamal deploy.yml file”The Kamal configuration is in config/deploy.yml.
You will need to update the following values:
- Docker image repo:
image: <namespace>/<repository-name>- this is the repository you created above. If you’re using Docker Hub, thenamespacewill typically be your username, and if you’re using ECR you can use the exact repository name you chose above. - Docker registry settings (see below)
- Your server IP address (or hostname)
<IP-ADDRESS>(this value is listed once per service). - Your app domain:
host: <your site url>in theproxysection at the end, if this is not already set via your project configuration.
For the registry section, if you’re using Docker Hub, you will need to add the username you chose above:
registry: username: <DOCKER REGISTRY USERNAME> # set this password: - KAMAL_REGISTRY_PASSWORDIf you’re using Amazon ECR, you should update it as follows:
registry: server: <your aws account id>.dkr.ecr.<your aws region id>.amazonaws.com username: AWS password: <%= %x(aws ecr get-login-password) %>For other registries, see the Kamal docs.
Update the .kamal/secrets file
Section titled “Update the .kamal/secrets file”Next, in your .kamal/secrets file you should add the following variables:
- If you’re using Docker Hub, set
KAMAL_REGISTRY_PASSWORDto the access token value you created above. If you’re using Amazon ECR, you can remove this variable. - Choose secure, unique, and ideally random values for
POSTGRES_PASSWORDandSECRET_KEY. - Update the
DATABASE_URLvalue (use the same password asPOSTGRES_PASSWORD).
You can review other settings in deploy.yml, but those should be all that you need to set yourself
for your first deployment.
Deploy
Section titled “Deploy”Finally, we can use Kamal to do the rest of the setup. Run the following on your local machine, from the project root directory.
kamal setupThis will perform all the tasks necessary to deploy your application (duplicated below from the Kamal docs):
- Connect to the servers over SSH (using root by default, authenticated by your SSH key).
- Install Docker on any server that might be missing it (using get.docker.com): root access is needed via SSH for this.
- Log into the registry both locally and remotely.
- Build the image using the standard Dockerfile in the root of the application.
- Push the image to the registry.
- Pull the image from the registry onto the servers.
- Ensure kamal-proxy is running and accepting traffic on ports 80 and 443.
- Start a new container with the version of the app that matches the current Git version hash.
- Tell kamal-proxy to route traffic to the new container once it is responding with 200 OK to GET /up.
- Stop the old container running the previous version of the app.
- Prune unused images and stopped containers to ensure servers don’t fill up.
If everything is set up properly then in five or so minutes you should be able to visit your new application at the configured domain. You’re done!
Post-deployment steps
Section titled “Post-deployment steps”Once you’ve gotten everything set up, head on over to the production checklist and run through everything there. In particular, you will have to set up media files using an external service like S3.
Manage changes after initial deployment
Section titled “Manage changes after initial deployment”See the config/README.md file in your project repo for pointers on managing the production environment after
the initial deployment.
The main command you will regularly run is kamal deploy, which will push new releases and configurations of your application.
Settings and Secrets
Section titled “Settings and Secrets”Kamal builds use the settings_production.py file.
You can add settings here, and use environment variables to manage any secrets, following the pattern used
throughout the file.
If you modify settings_production.py (or any other code) you will need to run:
kamal deployTo push the changes to your servers.
Secrets should be managed in environment variables. To add new environment variables you will need to update them in two places:
- The variable name needs to be added to the
envsection at the top ofconfig/deploy.yml. - The variable name and value needs to be added to
.kamal/secrets(the samesecretsfile we’ve been using above).
You can see examples of this for variables like DATABASE_URL in those two files.
Once you modify your environment variable files you will need to run:
kamal deployTo update the variables on the server and redeploy the app.
Running one-off commands
Section titled “Running one-off commands”The easiest way to run one-off commands on your server is to use the kamal app exec command.
For example:
kamal app exec -r web 'python manage.py bootstrap_subscriptions'If you want an interactive SSH-style shell you can run:
kamal app exec -i bashYou should now have a shell where you can run any Python/manage.py command.
You can also get a database shell by running:
kamal accessory exec postgres -i 'psql -h localhost -p 5432 -U <youruser>' --reuseFor more information see Kamal commands.
Troubleshooting
Section titled “Troubleshooting”Something went wrong during setup
Section titled “Something went wrong during setup”If the kamal setup command fails it should print out the error it got. Once you’ve resolved it,
you may need to set up the services individually instead of re-running it. You can do that with the commands below:
# rebuild the PostgreSQL containerkamal accessory reboot postgres
# rebuild the Redis containerkamal accessory reboot redis
# rebuild the proxy containerkamal proxy reboot
# build the proxy container (if it didn't succeed the first time)kamal proxy boot
# deploy the appkamal deploy
If deploy continues to fail, check the logs of your docker container, using:
kamal app logsResolving ERROR exec /bin/sh: exec format error
Section titled “Resolving ERROR exec /bin/sh: exec format error”If you see this error on your server/logs it is likely that the architecture used to build your image is not the same as the one running on your server.
Review the builder section of your deploy.yml file and in particular make sure multiarch is set to true.
You can also explicitly build the image on the remote server, or set the target architecture using
other builder options as described in the kamal docs.
Resolving ERROR /bin/sh: 1: /start: not found
Section titled “Resolving ERROR /bin/sh: 1: /start: not found”If you see this error on your server/logs it is likely that your /start script has the wrong line endings.
This can happen if you edit the ./deploy/docker_startup.sh file in certain programs on the Windows operating system.
To fix this, change the line endings of the file from CRLF to LF using your preferred text editor (you can Google or ask ChatGPT how to do this for your specific environment).
Health checks are failing because of ALLOWED_HOSTS
Section titled “Health checks are failing because of ALLOWED_HOSTS”Kamal runs a “health check” during deploys to ensure your new application is ready to handle requests. This involves pinging your workers on an internal docker address and waiting for them to respond with a “200 OK” status code.
Because it’s not possible to predict the hostname for these requests, a special middleware that bypasses the host check is included in Pegasus to handle this situation.
If health checks are failing that means the middleware isn’t set up properly.
The healthcheck url that kamal hits (/up by default), must match the path defined in apps.web.middleware.healthchecks.HealthCheckMiddleware
(also /up by default).
To fix it, confirm the following things:
- Ensure that
"apps.web.middleware.healthchecks.HealthCheckMiddleware",is the first middleware insettings.MIDDLEWARE. - Ensure that the paths match.
- The kamal path is defined in the
proxysection ofdeploy.yml, underhealthcheck. If there is nohealthchecksection, then it’s using the default path. - The middleware path is defined in
apps/web/middleware/healthchecks.py.
- The kamal path is defined in the
Cookbooks
Section titled “Cookbooks”Changing your site URL
Section titled “Changing your site URL”To change your site’s URL, do the following:
- Set up a new DNS endpoint as outlined above.
- Change the
hostvalue in your proxy configuration indeploy.ymlto the new domain. - Update your
ALLOWED_HOSTSsetting / environment variable as needed. - Run
kamal proxy reboot. - Run
kamal deploy
Your app should now be running on your new domain.
Getting a database backup
Section titled “Getting a database backup”Here is one way to get a database dump of your server:
First you can run the following command to save a database dump to the host machine:
kamal accessory exec postgres 'pg_dump -h localhost -p 5432 -U <your_app_user> <your_app_db_name> > db_dump.sql' --reuseThis should create a file on the host machine at /home/kamal/db_dump.sql.
If you want to copy this file locally, you can run:
Note: you may want to zip or gzip this file first if you have a large database.
Doing a database restore
Section titled “Doing a database restore”To restore a database you first put the backup file on the host:
Then create the DB:
kamal accessory exec postgres 'createdb -h localhost -p 5432 -U <your_app_user> <your_app_db_name>' --reuseAfter that you will need to login to the host machine:
And copy the database dump onto the DB machine.
Run docker ps to get the container id of the DB machine. Then run:
docker cp db_dump.sql <CONTAINER ID>:/tmp/db_dump.sqlFinally, login to the DB container:
docker exec -it <CONTAINER ID> /bin/bashAnd restore the data:
psql -h localhost -p 5432 -U <your_app_user> <your_app_db_name> < /tmp/db_dump.sqlDeploying multiple apps to the same server
Section titled “Deploying multiple apps to the same server”One of the major benefits of the VPS-based approach is that you can easily host multiple apps on the same hardware, which is usually a substantial cost advantage over hosting each one on its own.
This is now supported out of the box by Kamal and Pegasus.
To deploy multiple applications to the same server, just set up Kamal individually for each application
and run through the steps above.
Once multiple sites are set up, kamal-proxy will automatically route traffic to the right app based
on the site URL.
Running Docker as a non-root user
Section titled “Running Docker as a non-root user”Follow these steps if you don’t want to run kamal and Docker as the root user.
Manually Install Docker
Section titled “Manually Install Docker”If you don’t run kamal as root you’ll have to install Docker yourself.
You can test if Docker is installed by running docker -v on the command line. You should see output like
the following if it is installed correctly.
Docker version 24.0.5, build 24.0.5-0ubuntu1~20.04.1If you need to install it, you can find instructions in Docker’s documentation. You only need to install Docker Engine, not Docker Desktop.
Prepare a user account for Kamal
Section titled “Prepare a user account for Kamal”Next, create a user for Kamal to use.
You can choose any username you like. In this example we will use kamal.
We’ll also add this user to the docker group so that Kamal can run docker commands.
First login to your server as a user with root access. Then run the following commands:
sudo adduser kamal --disabled-passwordsudo adduser kamal --add_extra_groups dockerNext, add your SSH key to the kamal user’s authorized_keys file so you can login without a password.
If you need to generate an SSH key you can follow these steps:
sudo mkdir -p /home/kamal/.sshsudo cp ~/.ssh/authorized_keys /home/kamal/.ssh/authorized_keyssudo chown -R kamal:kamal /home/kamal/.sshNext, test the login works. Exit out of your server and on your local machine run:
ssh kamal@<ip-address>If you’ve set everything up properly the kamal user should be able to login with no password.
Once you’re logged in, as a final test, ensure the kamal user can run docker commands by running:
docker run hello-worldIf the command above completes without error you are ready to go!
Finally, update your config/deploy.yml file to specify a different user by adding
an ssh section, as described in the docs:
ssh: user: kamalCleaning up old Images on Amazon ECR
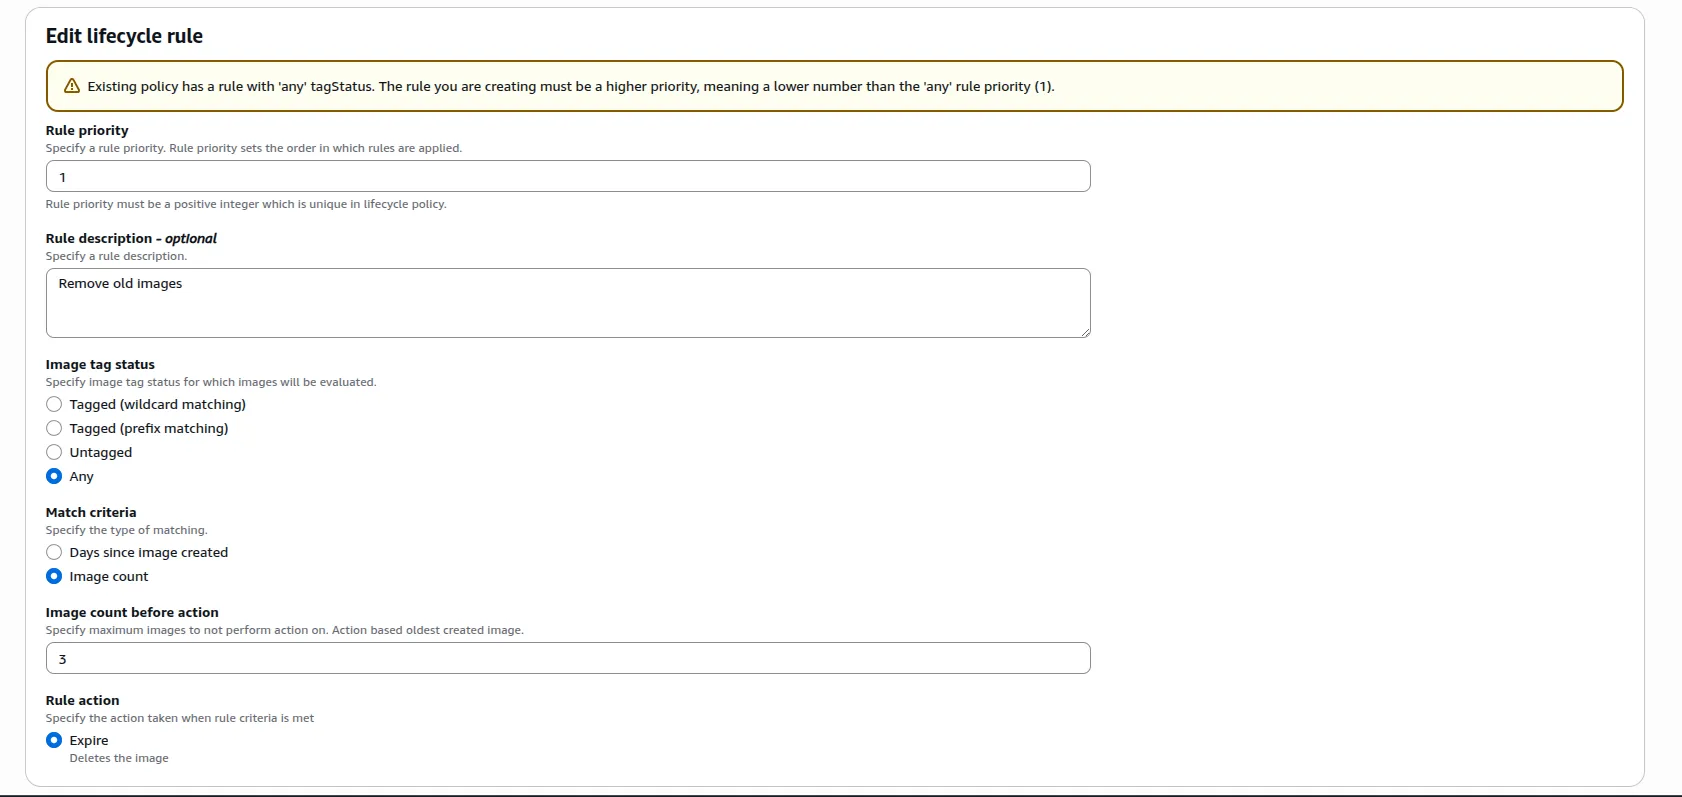
Section titled “Cleaning up old Images on Amazon ECR”Amazon ECR charges based on the amount of image storage you use. In order to keep costs down, you set a lifecycle policy that cleans up old images.
The following configuration can be used to clean up all but the most recent 3 images:
For more details, see Amazon’s documentation on lifecycle policies