Settings and Configuration
This section describes some of the settings and configuration details you can change inside Pegasus.
Settings and environment files
Section titled “Settings and environment files”Pegasus uses environment variables and django-environ to manage settings.
You can modify values directly in settings.py, but the recommended way to modify any setting
that varies across environments is to use a .env file.
Out-of-the-box, Pegasus will include multiple .env files for your settings:
.env is for development in either a native or a Docker-based environnment.
It will be picked up by default if you run ./manage.py runserver or docker compose start.
If you need to swap between these environments you might need to modify a few variables in this file---in
particular the database and redis URLs.
The .env is typically not checked into source control (since it may include secrets like API keys),
so is included in the .gitignore.
.env.example is an example file.
It is not used for anything, but can be checked into source control so that
developers can use it as a starting point for their .env file.
Projects downloaded as zip files will include a .env file, but projects
created or pulled from Github will typically only include a .env.example file,
so you will need to copy this file locally to run your development server.
Note: Pegasus versions prior to 2024.3 also included a .env.docker file.
This has been merged with the .env file.
Settings environment precedence
Section titled “Settings environment precedence”Most settings are configured in the form:
SOME_VALUE = env('SOME_VALUE', default='')As mentioned above, it is recommended to set these values in your environment / .env file,
which will always work as expected.
The environment takes precedence over the default if it’s set---even if it is set to an empty value. This can lead to confusing behavior.
For example, if in your .env file you have this line:
SOME_VALUE=''And in your settings.py you provide a default:
SOME_VALUE = env('SOME_VALUE', default='my value')The default will be ignored, and SOME_VALUE will be an empty string.
To fix this, either remove the value entirely from your .env file,
or explicitly set the value in your settings.py (instead of using the default argument).
E.g.
SOME_VALUE = 'my value'Project Metadata
Section titled “Project Metadata”When you first setup Pegasus it populated the PROJECT_METADATA setting in settings.py with various
things like page titles and social sharing information.
These settings can later be changed as you like by editing the setting directly:
PROJECT_METADATA = { 'NAME': 'Your Project Name', 'URL': 'http://www.example.com', 'DESCRIPTION': 'My Amazing SaaS Application', 'IMAGE': 'https://upload.wikimedia.org/wikipedia/commons/2/20/PEO-pegasus_black.svg', 'KEYWORDS': 'SaaS, django',}See the project metadata documentation for more information about how this is used.
Absolute URLs
Section titled “Absolute URLs”In most of Django/Pegasus, URLs are relative, represented as paths like /account/login/ and so forth.
But in some cases you need a complete URL, including the protocol (http vs https) and server (e.g. www.example.com).
These are necessary whenever you use a link in an email, with an external site (e.g. Stripe API callbacks and social authentication),
and in some places when APIs are accessed from your front end.
Setting your site’s protocol
Section titled “Setting your site’s protocol”The protocol is configured by the USE_HTTPS_IN_ABSOLUTE_URLS variable in settings.py.
You should set this to True when using https and False when not (typically only in development).
Setting your server URL
Section titled “Setting your server URL”When you first install Pegasus it will use the URL value from PROJECT_METADATA above to create
a Django Site object in your database.
The domain name of this Site will be used for your server address.
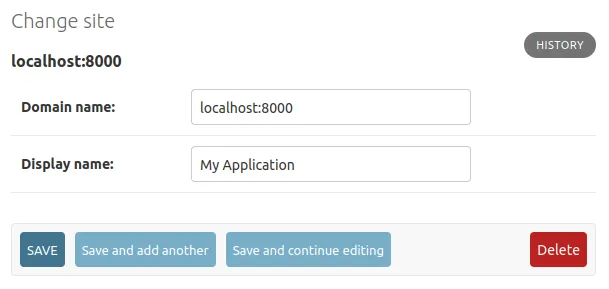
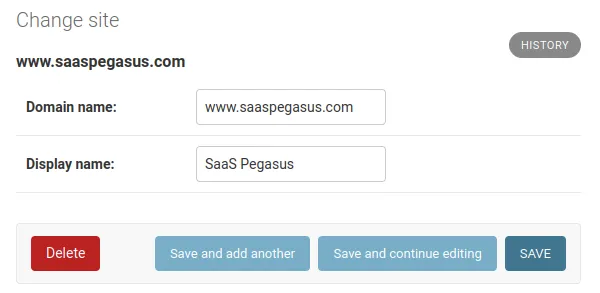
If you need to change the URL after installation, you can go to the site admin at admin/sites/site/ and
modify the values accordingly, leaving off any http/https prefix.
In development, you’ll typically want a domain name of localhost:8000, and in production this should
be the domain where your users access your app.
Note that this URL must match exactly what is in the browser address bar.
So, for example, if you load your development site from 127.0.0.1:8000 instead of localhost:8000 then
that is what you should put in.
Example Development Configuration

Example Production Configuration

Sending Email
Section titled “Sending Email”Pegasus is setup to use django-anymail to send email via Amazon SES, Mailgun, Postmark, and a variety of other email providers.
To use one of these email backends, change the email backend in settings.py to:
EMAIL_BACKEND = 'anymail.backends.mailgun.EmailBackend'And populate the ANYMAIL setting with the required information. For example, to use Mailgun
you’d populate the following values:
ANYMAIL = { "MAILGUN_API_KEY": "key-****", "MAILGUN_SENDER_DOMAIN": 'mg.{{project_name}}.com', # should match what's in mailgun}If you are in the EU you may also need to add the following entry:
'MAILGUN_API_URL': 'https://api.eu.mailgun.net/v3',The anymail documentation has much more information on these options.
The following django settings should also be set:
SERVER_EMAIL = 'noreply@{{project_name}}.com'DEFAULT_FROM_EMAIL = 'you@{{project_name}.com'ADMINS = [('Your Name', 'you@{{project_name}}.com'),]See Sending email in the django docs for more information.
User Sign Up
Section titled “User Sign Up”The sign up workflow is managed by django-allauth with a sensible set of defaults and templates.
Social logins
Section titled “Social logins”Pegasus optionally ships with “Login with Google/Twitter/Github” options.
You’ll separately need to follow the steps listed on the provider-specific pages here to configure things on the other side. These steps can sometimes be a bit involved and vary by platform. But will generally entail two steps:
- Creating a new application / client on the service you want to use.
- Adding the credentials to your environment (
.env) file.
See the Google guide below for an example you can follow.
If you want to add a social login that’s not supported out of the box (e.g. Facebook/Meta or Apple), you can follow the existing patterns and configure things based on the allauth docs.
If you need help setting this up feel free to get in touch! Additionally, see the resources below.
Google OAuth Specific instructions
Section titled “Google OAuth Specific instructions”- Register the application with google by following just the “App registration” section
here. Note that
the trailing slash for the “Authorized redirect URLs” is required. For example, assuming you are developing locally,
it should be set to exactly
http://localhost:8000/accounts/google/login/callback/. - Set the resulting client id and secret key in the
.envfile in the root of your project.GOOGLE_CLIENT_ID="actual client id from the google console"GOOGLE_SECRET_ID="actual secret id from the google console"
Other Social Setup Guides
Section titled “Other Social Setup Guides”The Pegasus community has recommended the following guides to set things up with specific providers:
Requiring email confirmation
Section titled “Requiring email confirmation”Pegasus does not require users to confirm their email addresses prior to logging in.
However, this can be easily changed by changing the following value in settings.py
ACCOUNT_EMAIL_VERIFICATION = 'optional' # change to "mandatory" to require users to confirm email before signing in.Note: The email verification step will be skipped if using a social login.
Enabling sign in by email code
Section titled “Enabling sign in by email code”Sign in by email code is controlled by the ACCOUNT_LOGIN_BY_CODE_ENABLED setting.
You can enable / disable it in settings.py.
ACCOUNT_LOGIN_BY_CODE_ENABLED=TrueTwo-factor authentication
Section titled “Two-factor authentication”Two-Factor authentication (2FA) is configured using the allauth’s mfa support.
When using Two-Factor Auth with Pegasus, a new section is added to the user profile for enabling & configuring the OTP (one-time password) devices for the user.
If a user has a Two-Factor device configured then they will be prompted for a token after logging in.
Customizing emails
Section titled “Customizing emails”Pegasus ships with simple, responsive email templates for password reset and email address confirmation.
These templates can be further customized by editing the files in the templates/account/email directory.
See the allauth email documentation for more information about customizing account emails.
Disabling public sign ups
Section titled “Disabling public sign ups”If you’d like to prevent everyone from signing up for your app, set the following in your settings.py,
replacing the existing value:
ACCOUNT_ADAPTER = 'apps.users.adapter.NoNewUsersAccountAdapter'This will prevent all users from creating new accounts, though existing users can continue to login and use the app.
Further configuration
Section titled “Further configuration”Allauth is highly configurable. It’s recommended that you look into the various configuration settings available within allauth for any advanced customization.
Stripe
Section titled “Stripe”If you’re using Stripe to collect payments you’ll need to fill in the following in settings.py
(or populate them in the appropriate environment variables):
STRIPE_LIVE_PUBLIC_KEY = os.environ.get("STRIPE_LIVE_PUBLIC_KEY", "<your publishable key>")STRIPE_LIVE_SECRET_KEY = os.environ.get("STRIPE_LIVE_SECRET_KEY", "<your secret key>")STRIPE_TEST_PUBLIC_KEY = os.environ.get("STRIPE_TEST_PUBLIC_KEY", "<your publishable key>")STRIPE_TEST_SECRET_KEY = os.environ.get("STRIPE_TEST_SECRET_KEY", "<your secret key>")STRIPE_LIVE_MODE = False # Change to True in productionGoogle Analytics
Section titled “Google Analytics”To enable Google Analytics, add your analytics tracking ID to your .env file or settings.py file:
GOOGLE_ANALYTICS_ID = 'UA-XXXXXXX-1'Pegasus uses a “global site tag” with gtag.js by default, which is a simpler version of Google Analytics that can be rolled out
with zero additional configuration.
If you use Google Tag Manager, you can make changes in templates/web/components/google_analytics.html to
match the snippet provided by Google.
See this article for more on the differences between gtag.js and Google Tag Manager.
Sentry
Section titled “Sentry”Sentry is the gold standard for tracking errors in Django applications and Pegasus can connect to it with a few lines of configuration.
If you build with Sentry enabled, all you need to do is populate the SENTRY_DSN setting - either
directly in your settings.py or via an environment variable.
After setting it up on production, you can test your Sentry integration by visiting https://<yourdomain>/simulate_error.
This should trigger an exception which will be logged by Sentry.
OpenAI and LLMs
Section titled “OpenAI and LLMs”For help configuring LLMs and AIs, see the AI docs.
Celery
Section titled “Celery”See the celery docs for set up and configuration of Celery.
Turnstile
Section titled “Turnstile”To enable support for Cloudflare Turnstile,
set TURNSTILE_KEY and TURNSTILE_SECRET in your settings or environment variables.
This should automatically enable turnstile on your sign up pages.
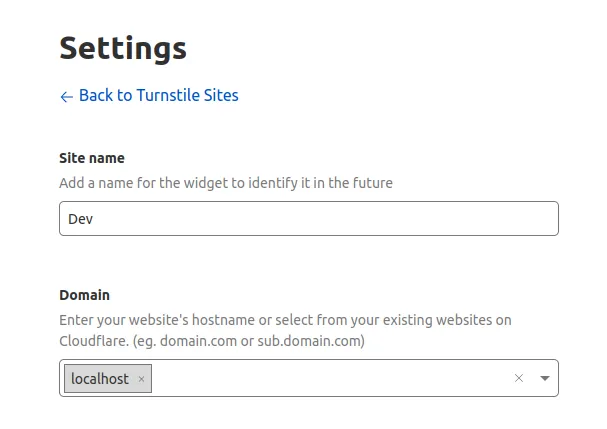
It is recommended to create two different Turnstile accounts on Cloudflare for development and production. In development you can specify “localhost” as your domain like this:

In production, you should replace that with your site’s production domain.
Mailing List
Section titled “Mailing List”Pegasus includes support for subscribing users to a marketing email list upon signup. Currently, three platforms are supported:
Make sure you choose the platform you would like to use when building your Pegasus project.
Then follow the instructions below for the platform you’ve chosen. After completing these steps, new sign-ups will automatically be added to your configured marketing list. Note that it is your responsibility to notify your users / get their consent as per your local privacy regulations.
Mailchimp
Section titled “Mailchimp”To enable the Mailchimp integration, first create a mailing list, then fill in the following to values in your environment/settings.
MAILCHIMP_API_KEY = '<Api Key>'MAILCHIMP_LIST_ID = '<List ID>'Kit (formerly ConvertKit)
Section titled “Kit (formerly ConvertKit)”To enable the Kit integration, create your Kit account and go to Settings —> Developer, and create a new V4 API key.
Then add the API key value to your .env file or your environment/settings.
KIT_API_KEY = "<Api Key>"That’s it! New user sign-ups will automatically be added as Kit subscribers.
Email Octopus
Section titled “Email Octopus”To enable the Email Octopus integration, first create a mailing list, then fill in the following values in your environment/settings.
EMAIL_OCTOPUS_API_KEY = "<Api Key>"EMAIL_OCTOPUS_LIST_ID = "<List ID>"Note: If you use this link to sign up for email octopus, you’ll get $15 off your first payment, and help support Pegasus.
Logging
Section titled “Logging”Pegasus ships with a default Django log configuration which outputs logs to the console as follows:
- Django log messages at level INFO and above
- Pegasus log messages at level INFO and above
The Pegasus loggers are all namespaced with the project name e.g. {{project_name}}.subscriptions.
Changing log levels
Section titled “Changing log levels”There are two environment variables which can be used to control the log levels of either Django messages or Pegasus message:
DJANGO_LOG_LEVEL{{project_name.upper()}}_LOG_LEVEL
Alternatively the entire log configuration can be overridden using the LOGGING setting as described in the
Django docs.
Storing media files
Section titled “Storing media files”SaaS Pegasus ships with optional configuration for storing dynamic media files in S3 e.g. user profile pictures. If you do not have this enabled the default Django configuration will be used which requires you to have persistent storage available for your site such as a Docker volume.
Setting up S3 media storage
Section titled “Setting up S3 media storage”For a video walkthrough of this content (using kamal deployment), see below:
This section assumes you have set up your SaaS Pegasus project with the S3 media file storage enabled.
In order to use S3 for media storage you will need to create an S3 bucket and provide authentication credentials for writing data to the bucket.
Once you have done the S3 setup (see below), you can update your .env file as follows:
USE_S3_MEDIA=TrueAWS_ACCESS_KEY_ID=<IAM user's access key>AWS_SECRET_ACCESS_KEY=<IAM user's secret key>With this configuration your media files will be accessible at
https://{{ project_name }}-media.s3.amazonaws.com/media/.
This guide is an excellent resource with step-by-step instructions for the S3 setup.
Additional settings
Section titled “Additional settings”AWS_STORAGE_BUCKET_NAME
: Name of the S3 bucket to use. Defaults to {{project_name}}-media.
Alternative storage backends
Section titled “Alternative storage backends”Should you wish to use a different storage backed e.g. Digital Ocean Spaces you can follow the setup described in the django-storages documentation.
There is also a Pegasus community guide that walks through this in more detail.
Django Debug Toolbar
Section titled “Django Debug Toolbar”Pegasus ships with Django Debug Toolbar as an optional package. This section describes how the feature is configured in Pegasus.
The django-debug-toolbar package is placed in the dev-requirements.txt file which means it will only
be available in dev environments. Should you wish to use it in a production environment you will need
to add it to your prod-requirements.in file and re-build your prod-requirements.txt file.
By default, the toolbar is enabled in development environments via the ENABLE_DEBUG_TOOLBAR setting
in your .env file(s). You can change this setting in any environment to turn it on/off.
ENABLE_DEBUG_TOOLBAR=True